

Buy the Triple PCB set:
Buy the Individual Triple EG PCBs:


DOCUMENTS:
ENVVD:
The ENVVD EG is not normally part of the Triple EG, but can be substituted for one of the other EGs. Contact me first please. PANEL MODIFICATIONS NEEDED IF YOU SUBSTITUTE AN ENVVD. Or it can be implemented individually. See here for info on the ENVVD.
FUNCTION:
This is a long page, but please read through it. This is not a complicated module, but there are a lot of weird wires to connect and the EGs are actually pretty unique in the modular world.
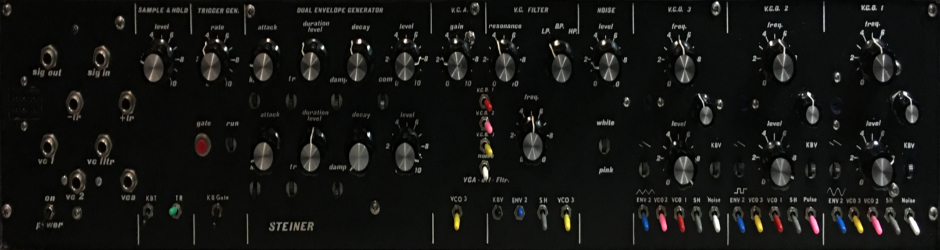
This module produces a voltage envelope. Three different envelope generators (EG) are included in this module with three separate outputs. Output 3 can be combined with output 1 and/or output 2.
A voltage envelope is most often used to control the amplitude of a voltage controlled amplifier (VCA) which helps to define a sound. Controls typically include an attack time, an intermediate decay time, a sustain level, and a release time. These three EGs include these basic controls, but add extra features which make them even more interesting and useful.
EGs can be used for more than just controlling an envelope. Nyle related a story when he was working on the soundtrack for Apocalypse Now. He wanted to add a low frequency “whap, whap, whap” for the helicopter blades, EG to the rescue…
From the Synthasystem Manual:
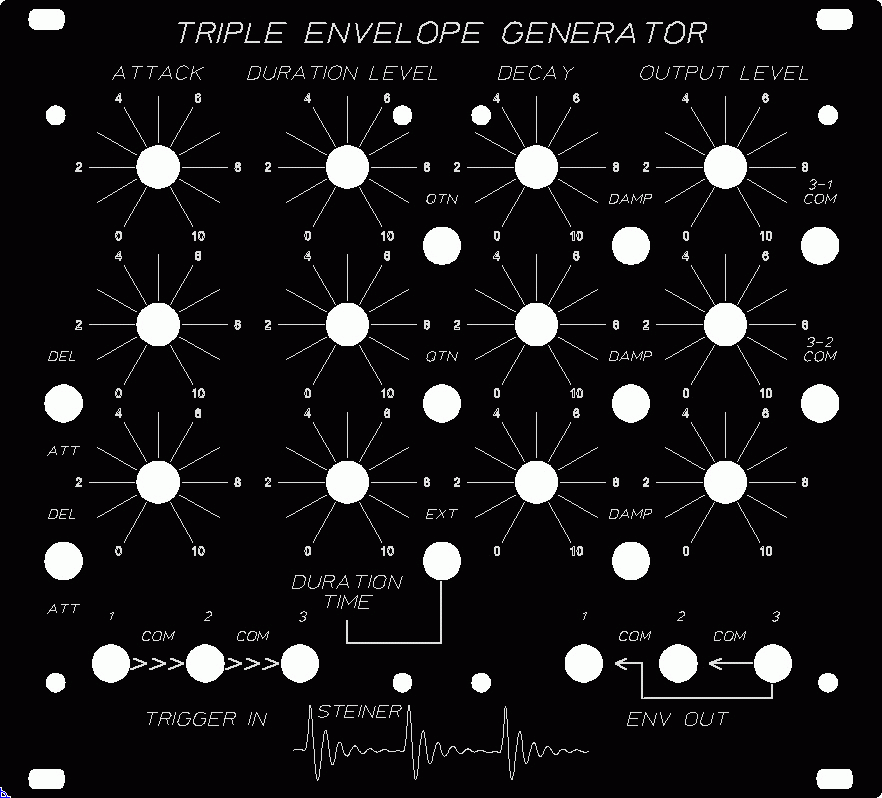
This module contains three envelope generators. Envelope generators one and two have controls on attack, trigger duration level, decay and overall output level. The third (bottom) envelope generator has controls on attack, duration time, decay, and output level. Envelope Generator #3 has a switch located near the duration time pot so that the duration time can be controlled with the Duration Time pot irregardless of the trigger duration, or externally Ext. position) by the duration of the input trigger.
All three envelope generators have damp switch. When this switch is in the Damp position, the envelope voltage will go immediately to zero whenever the input trigger is over. See figure #3 part B.
Env Gen #1 and #2 each have a Quathin function switch mark QTN. With the QTN switch down, the decay can start only after the attack reaches its peak level (set by the attack knob) even when the trigger duration is less than the attack time (see figure 3 part C). With the QTN switch up, the decay can start anytime, even before the attack has reached its peak, if the input trigger duration is less than the attack time. That is, the decay starts whenever the trigger ends.
The three trigger input jacks are connected such that all three envelope generators will trigger simultaneously from a trigger fed into the #1 input jack. Each envelope generator can be triggered separately by plugging into the other two trigger input jacks respectively. When a cable is plugged into Envelope #2 input jack, it disconnects the envelope gen input from the #1 jack and accepts a trigger from the cable. Example, with a keyboard trigger plugged into #1 jack and the trigger Gen. plugged into env. #2 input jack, envelope gen #1 and #3 will trigger from the keyboard and Env #2 will trigger from the trigger gen.
Envelope Generators #1 and #2 each have a com switch on their outputs. These switches enable envelope #3 to be combined with envelope #1 or envelope #2 or both. For example,
Only triggers and never audio signals are fed into the envelope generator. The envelope generator’s output voltages can control the gain of the VCA, which in turn will control the amplitude of audio signals. Or, the gen’s output can be used to control any other voltage controlled device such as the oscillators, the filter or the phaser.
Here are the figures from the manual:


USE:
The use will be split up into the three separate EGs since they are different:
EG1:
This EG is labeled ENVDL which means ENVelope generator Duration Level. This EG accepts S-Triggers or Gates. A trigger is a short pulse that is independent of how long a key is pressed, button is pushed, etc. A gate is like a trigger, but the duration depends on how long a key is pressed, button is pushed, etc. In normal operation, QTN off, DAMP off, when a trigger is input, the envelope will rise to its maximum, then immediately start to decay.
If a gate is input which lasts longer than the attack time, the envelope will rise to the maximum level then decay to the Duration Level and hold there until the gate is over. The envelope then decays according to the Decay level to zero.
The fun begins with the QTN and DAMP switches…
Inputs/Outputs:
This module has one input and one output:
- Trigger input – This accepts a trigger/gate signal. This jack is also commoned to input 2 and input 3. However, if a plug is inserted into input 2 or input 3, the common connection is over-ridden and the plugged in signal is routed to EG2 or EG3. The PCB has both S-Trigger and V-Trigger inputs. You can bring one or the other or both out to the front panel.
- Envelope output – This is the output of the EG. It’s a time varying signal which is dependent on the various knobs, switches, and trigger/gate.
Knobs:
This module has 4 knobs:
- Attack – This knob controls the time it takes for the EG output to reach it’s full output level. The Quathin (QTN), and Damp switch have an effect on the eventual maximum level and will be described below.
- Duration Level – This sets the output level of the EG to which it will decay if a gate of sufficient duration time is present at the Trigger Input.
- Decay – This sets the time it takes for the envelope to decay to the Duration Level, and to zero. It also controls the decay time when the Quathin function is enabled.
- Output Level – An attenuator which controls the overall output level of the EG
Switches:
There are 3 switches on this module:
- QTN – Quathin. Nyle told me he thought the sound the damp pedal on a Rhodes electric piano made sounded like “quathin”. So, he called this function Quathin. When enabled, the signal will start to decay as soon as the trigger or gate is over. It will decay at the time constant set by the Decay knob.
- DAMP – Damp is similar to QTN and will override the QTN switch when it is on. This mode will cause the envelope to decay immediately on release of the trigger or gate, but it will decay rapidly, (instantly?) to zero.
- 3-1 COM – This switch combines the output of EG3 with the output of EG1.
When either the Quathin or Damp mode is enabled, the envelope will follow the envelope as set by the knobs until the trigger/gate is over. That means, if you are inputting a gate, and it completes the Attack phase and passes into the Duration phase, the EG will behave as if the QTN switch is not on. When you release the gate, it will immediately decay with the setting of the Decay knob. However, it the Damp is enabled, the decay is immediate and fast regardless the Decay setting.
EG2:
This EG is labeled ENVDL which means ENVelope generator Duration Level. This EG accepts S-Triggers or Gates. A trigger is a short pulse that is independent of how long a key is pressed, button is pushed, etc. A gate is like a trigger, but the duration depends on how long a key is pressed, button is pushed, etc. In normal operation, QTN off, DAMP off, when a trigger is input, the envelope will rise to its maximum, then immediately start to decay.
If a gate is input which lasts longer than the attack time, the envelope will rise to the maximum level then decay to the Duration Level and hold there until the gate is over. The envelope then decays according to the Decay level to zero.
It has an additional switch which changes the Attack Rate control into a delay for the incoming trigger/gate.
The fun begins with the QTN, DAMP, and ATT/DEL switches…
Inputs/Outputs:
This module has one input and one output:
- Trigger input – This accepts a trigger/gate signal. This jack is also commoned to input 2 and input 3. However, if a plug is inserted into input 2 or input 3, the common connection is over-ridden and the plugged in signal is routed to EG2 and EG3.
- Envelope output – This is the output of the EG. It is a time varying signal which is be dependent on the various knobs, switches, and trigger/gate.
Knobs:
This module has 4 knobs:
- Attack – This knob controls the time it takes for the EG output to reach it’s full output level. The Quathin (QTN), and Damp switch have an effect on the eventual maximum level and will be described below. Depending on the mode of the ATT/DEL switch, it can also adjust the length of a delay to start the envelope. See the ATT/DEL switch info below.
- Duration Level – This sets the output level of the EG to which it will decay if a gate of sufficient duration time is present at the Trigger Input.
- Decay – This sets the time it takes for the envelope to decay to the Duration Level, and to zero. It also controls the decay time when the Quathin function is enabled.
- Output Level – An attenuator which controls the overall output level of the EG
Switches:
There are 4 switches on this module:
- ATT/DEL – This switch converts the attack time setting on the Attack knob to an equivalent delay time. For example, if the Attack knob is set such that it takes 1 second for the envelope to reach its peak output, when the switch is set to DEL, the attack will not start for 1 second, then the attack will rapidly (instantly?) rise to the peak voltage output, then continue normally.
- QTN – Quathin. Nyle told me the he thought the sound the damp pedal on a Rhodes electric piano made a sound that to him sounded like “quathin”. He called this function Quathin. When enabled, the signal will start to decay as soon as the trigger or gate is over. it will decay at the time constant set by the Decay knob.
- DAMP – Damp is similar to QTN and will override the QTN switch when it is on. This mode will cause the envelope to decay immediately on release of the trigger or gate, but it will decay rapidly, to zero.
- 3-2 COM – This switch combines the output of EG3 with the output of EG2.
When either the Quathin or Damp mode is enabled, the envelope will follow the envelope as set by the knobs until the trigger/gate is over. That means, if you are inputting a gate, and it completes the Attack phase and passes into the Duration phase, the EG will behave as if the QTN switch is not on. When you release the gate, it will immediately decay with the setting of the Decay knob. However, it the Damp is enabled, the decay is immediate and fast regardless the Decay setting.
EG3:
This EG is labeled ENVDT which means ENVelope generator Duration Time. This EG accepts S-Triggers or Gates. A trigger is a short pulse that is independent of how long a key is pressed, button is pushed, etc. A gate is like a trigger, but the duration depends on how long a key is pressed, button is pushed, etc. In normal operation, QTN off, DAMP off, when a trigger is input, the envelope will rise to its maximum, then immediately start to decay.
This EG is different from EG1 and EG2 in that regardless how long the trigger/gate is applied, the EG will rise to its maximum output, and will sustain that level according to the Duration Time setting. This time can be switched to be dependent on the duration of the input trigger/gate.
The fun begins with the DAMP and ATT/DEL switches…
Inputs/Outputs:
This module has one input and one output:
- Trigger input – This accepts a trigger/gate signal. This jack is also commoned to input 2 and input 3. However, if a plug is inserted into input 2 or input 3, the common connection is over-ridden and the plugged in signal is routed to EG2 and EG3.
- Envelope output – This is the output of the EG. It is a time varying signal which is be dependent on the various knobs, switches, and trigger/gate.
Knobs:
This module has 4 knobs:
- Attack – This knob controls the time it takes for the EG output to reach it’s full output level. The Damp switch has an effect on the eventual maximum level and will be described below. Depending on the mode of the ATT/DEL switch, it can also adjust the length of a delay to start the envelope. See the ATT/DEL switch info below.
- Duration Time – This sets the length of time the envelope will remain at its maximum level before it decays depending on the position of the EXT switch. See the EXT switch below.
- Decay – This sets the time it takes for the envelope to decay to the Duration Level, and to zero. It also controls the decay time when the Quathin function is enabled.
- Output Level – An attenuator which controls the overall output level of the EG
Switches:
There are 3 switches on this module:
- ATT/DEL – This switch converts the attack time setting on the Attack knob to an equivalent delay time. For example, if the Attack knob is set such that it takes 1 second for the envelope to reach its peak output, when the switch is set to DEL, the attack will not start for 1 second, then the attack will rapidly (instantly?) rise to the peak voltage output, then continue normally.
- EXT – When this mode is enabled, switch up, the duration time is controlled by the length of the input trigger/gate. If the DAMP mode is off, the decay is controlled by the setting of the DECAY knob. If DAMP is enabled, see below.
- DAMP – Damp mode will cause the envelope to decay immediately on release of the trigger or gate, but it will decay rapidly, (instantly?) to zero. The DECAY setting has no effect when this switch is on.
GENERAL CONNECTIONS:
Pretty simple. Connect a trigger or gate to the input. Adjust the various knobs and switches and connect the output to a VCA, VCO, VCF, anything that can use a voltage signal.
COMPONENT SELECTION:
See the Component Notes page for more information.
Resistors:
This module was originally built with carbon core, 5% resistors with one or two 1% metal film resistors. So, you have a wide range of options here. I recommend using 1% tolerance, metal film resistors everywhere.
Capacitors:
There are probably a billion different ceramic capacitors at a place like Mouser. Pick a capacitor that can fit the hole easily, typically 0.1 inch on centers. The tolerance is not as important as the temperature stability.
All Electrolytics should be 25 to 35 volt.
There is a choice for the timing capacitors, i.e.: C2 on the ENVDL PCB, and C2 and C3 on the ENVDT.
Nyle used a 2 Meg pot and a 3.9u capacitor. 2 Meg pots are just about impossible to find. As a perfectly good option, you can use a 1 Meg pot and double the value of the timing capacitor, about 7.8u. OK, you can’t find a 7.8u electrolytic or anything really close. There are a couple of choices.
You can use a tantalum capacitor at 8.2u ($2.57 each at Mouser!!!), or
Just use the next highest/lower value to 7.8u. The tolerance on many of these capacitors is +/-20% anyway which amounts to 1.5u on a 7.8 u capacitor.
The effect will be shorter minimum rise times and shorter maximum fall times if you pick a lower value. Opposite for a larger capacitor. It really is a matter of taste. Personally, I used a 8.2u tantalum and it seems to be fine.
For C3 on the ENVDT, the same holds true except you are doubling a 1.2u to a 2.4u which doesn’t exist either. However, you can find a 2.7u tantalum for about $0.72 at Mouser. Or, just use the next closest electrolytic to 2.4u, bigger gets longer times, smaller gets shorter times.
Transistors:
The original used 2N5172 NPN and 2N5138 PNP transistors. These are still available, but I could only find a “PN5138” which I think is the same transistor. In any event, you can use any standard NPN or PNP transistors and they should work.
Diodes:
Nothing special, 1N4148s are fine.
Pots:
Your choice for your panel. If you use the panel I laid out, the holes and spacing will work for the Alpha 12 and 16mm pots. You can probably use nicer BTI, Bourns, etc. 9mm pots with “pot chiclets”.
2 Meg audio taper pots are hard to find. Very weird I think, but true. The schematic and PCB call for a 2 Meg audio taper pot for the Decay and Attach controls on the ENVDL, and for the Decay, Attack, and Duration controls no the ENVDT module. Since these form a simple RC circuit with a timing capacitor, you can use 1 Meg audio taper pots and double the value of the appropriate capacitor.
As of this writing, 3/14/2021, Pharmsonic has 2 Meg audio taper pots:
https://www.pharmasonic.jp/shop/index.php
https://www.pharmasonic.jp/shop/index.php?id_product=143&controller=product
The threaded bushing has a diameter of approximately 6.8 mm, the same as many of the Alpha pots.
Jacks:
For the panel I laid out, a good 3.5mm or 1/8 inch jack will work. I use the Switchcraft 42A Tini-Jax true 1/8 inch jack. These are switched jacks and they work with 1/8 inch plugs and 3.5 mm plugs.
Switches:
For the toggles, use a good miniature SPST/SPDT as required. Mountain is fine. Number 108-1MS1T1B1M1QE-EVX, Mouser number the same. For the DPDT, Mountain 108-0010-EVX, same Mouser number.
BUILD NOTES:
Inter-PCB Connections:
These three PCBs interconnect through the ENVDT common connections. Refer to the schematics of the EGs. EG3, the ENVDT has connectors for switches and a couple of diodes. It also has an output connector for a “common” to EG1 and EG2. Now, looking at the schematic for the ENVDL and noting the differences for the type 1 and type 2, you can see where this “common” wire from the ENVDT, EG3 connects. On the PCBs for the ENVDL, EG1, and EG2, there are connectors with one pin noted as Com 1 and Com 2. On EG1, connect the Com 1 terminal on the ENVDT, EG3 to the Com 1 pin. Likewise for Com 2.
The ENVDL PCB is setup to wire a type 1 EG, or a type 2 EG for the Triple Envelope Generator. Referring to the schematic and PCB layout, it should be understandable which components are used/omitted for each type.
For ENVDL type 1:
INSTALL R20, and wire up R19, the panel potentiometer.
DO NOT INSTALL R21, R23, R25, Q9 on the PCB or wire SW1 or the R24 potentiometer.
Connect Com1 to the appropriate spot on the ENVDT PCB.
For ENVDL type 2:
DO NOT INSTALL R20, or wire up R19, the panel potentiometer.
INSTALL R21, R23, R25, Q9 on the PCB and wire up SW1 and R24, the panel potentiometer.
Connect Com2 to the appropriate spot on the ENVDT PCB.
For power, you can daisy chain and/or use both the power connectors on the Power regulation PCB to provide power this these PCBs. This combination of PCBs/modules still should only take about 70mA (from the old specs), so you should be OK without a heatsink. But, if you want to use one, I’ve used an Aavid Thermalloy “snap-on” heatsink. Not huge, but it helps.
Mouser p/n: 532-576802B00
Mfgr. p/n: 576802B00000G
For ENVDT:
The silk screen does not show the proper values for R22 or R28.
- R22 – 1.2k
- R28 – 5.1k
Trigger Conversion:
There is a built in trigger conversion circuit to convert incoming voltage triggers to the required S-Triggers. If you want to use S-Triggers, just wire the trigger jack to the S-Trigger input. If you want to use V-Triggers, just wire the trigger jack to the V-Trigger input. You can have both, too if you want.
Jacks and Common Connections:
The three trigger/gate inputs to the EGs should be commoned together such that a trigger/gate applied to CV1 should be present at CV2 and CV3. Plugging a trigger/gate cable into either CV2 or CV3 should break this common connection to that EG only. However, as with all DIY, you can connect these jacks any way you want.
Soldering:
I assume you know the basics of soldering. I like to insert the low lying parts first, like resistors, diodes, etc. After these, I install the IC sockets. Next capacitors, transistors, connectors. Use a good solder, either an organic flux, which you should wash regularly, or a no-wash flux.
Take a break every so often, wash off the flux if you are using a flux which required cleaning. Double and triple check orientations, pins, and solder joints.
Power Supply Regulation/Filtering:
This PCB requires the Power/Regulation daughter board. I did it this way to allow this PCB to be parallel to the front panel which allows it to mount in shallow cabinets.
See this page for details on this module.
Neither EG PCB uses the filtered supplies or -10 volts. You just need to connect GND and +12, pins 1 and 2.
Build this PCB first and get the regulators (if you use them) trimmed to +12/-10 volts.
Some additional comments here. These modules are tested to run on +/-12 VDC. The original power supply in the Synthasystem was +12/-10 VDC due to how Nyle designed the -10 volt section of the power supply, not for any magical requirement to have -10 volts.
With that said, the power/regulation PCB has 2 voltage regulators on it which can be set to +12/-10 (or +/-12 volts) depending on your needs. If you are coming from +/-15 volts, you need both regulators and you may as well set one to -10 volts.
If you are coming from +/-12 volts, technically you don’t need the regulators, but if you want, install the negative one and set it to -10 volts. When this board is not connected to the main VCO PCB, you have to have a minimal load in order for the regulators to regulate, that’s the purpose of the LEDs. you can install these for fun if you want, but are not needed if you don’t use the regulators.
Important… if you don’t install the regulators, you have to install a jumper between pins 2 and 3 as shown on the Power/Regulation PCB or you won’t get power to the VCO.
COMPONENT PLACEMENT:
No special considerations here. Just use good judgement when placing parts.
If you choose to not use the Trigger Generator PCB as a piggy back or as a stand alone module and you want this EG to use Voltage – Triggers, refer to the Trigger Generator page and mount the transistor, resistor, and diode on the trigger input jacks. I’ve seen these stuffed into a 1/4 inch jack, so it should be doable.
MOUNTING:
These PCBs have four holes to allow flexible mounting configurations. The FPE Euro panel is setup to allow these PCBs to be mounted parallel to the panel using some 3/4 to 1 inch (typical) standoffs. The mounting holes are connected to ground. The Power Regulation PCB will mount to these PCBs using standoffs as will the Trigger Converter PCB is you choose to use it. In the end, you will have two or three PCBs stacked on each other.
Why not put it all on one PCB? I thought some might want to make individual EG modules, that’s why.